TDubs tiny tent

This site may earn a commission from merchant affiliate links, including eBay, Amazon, and others.
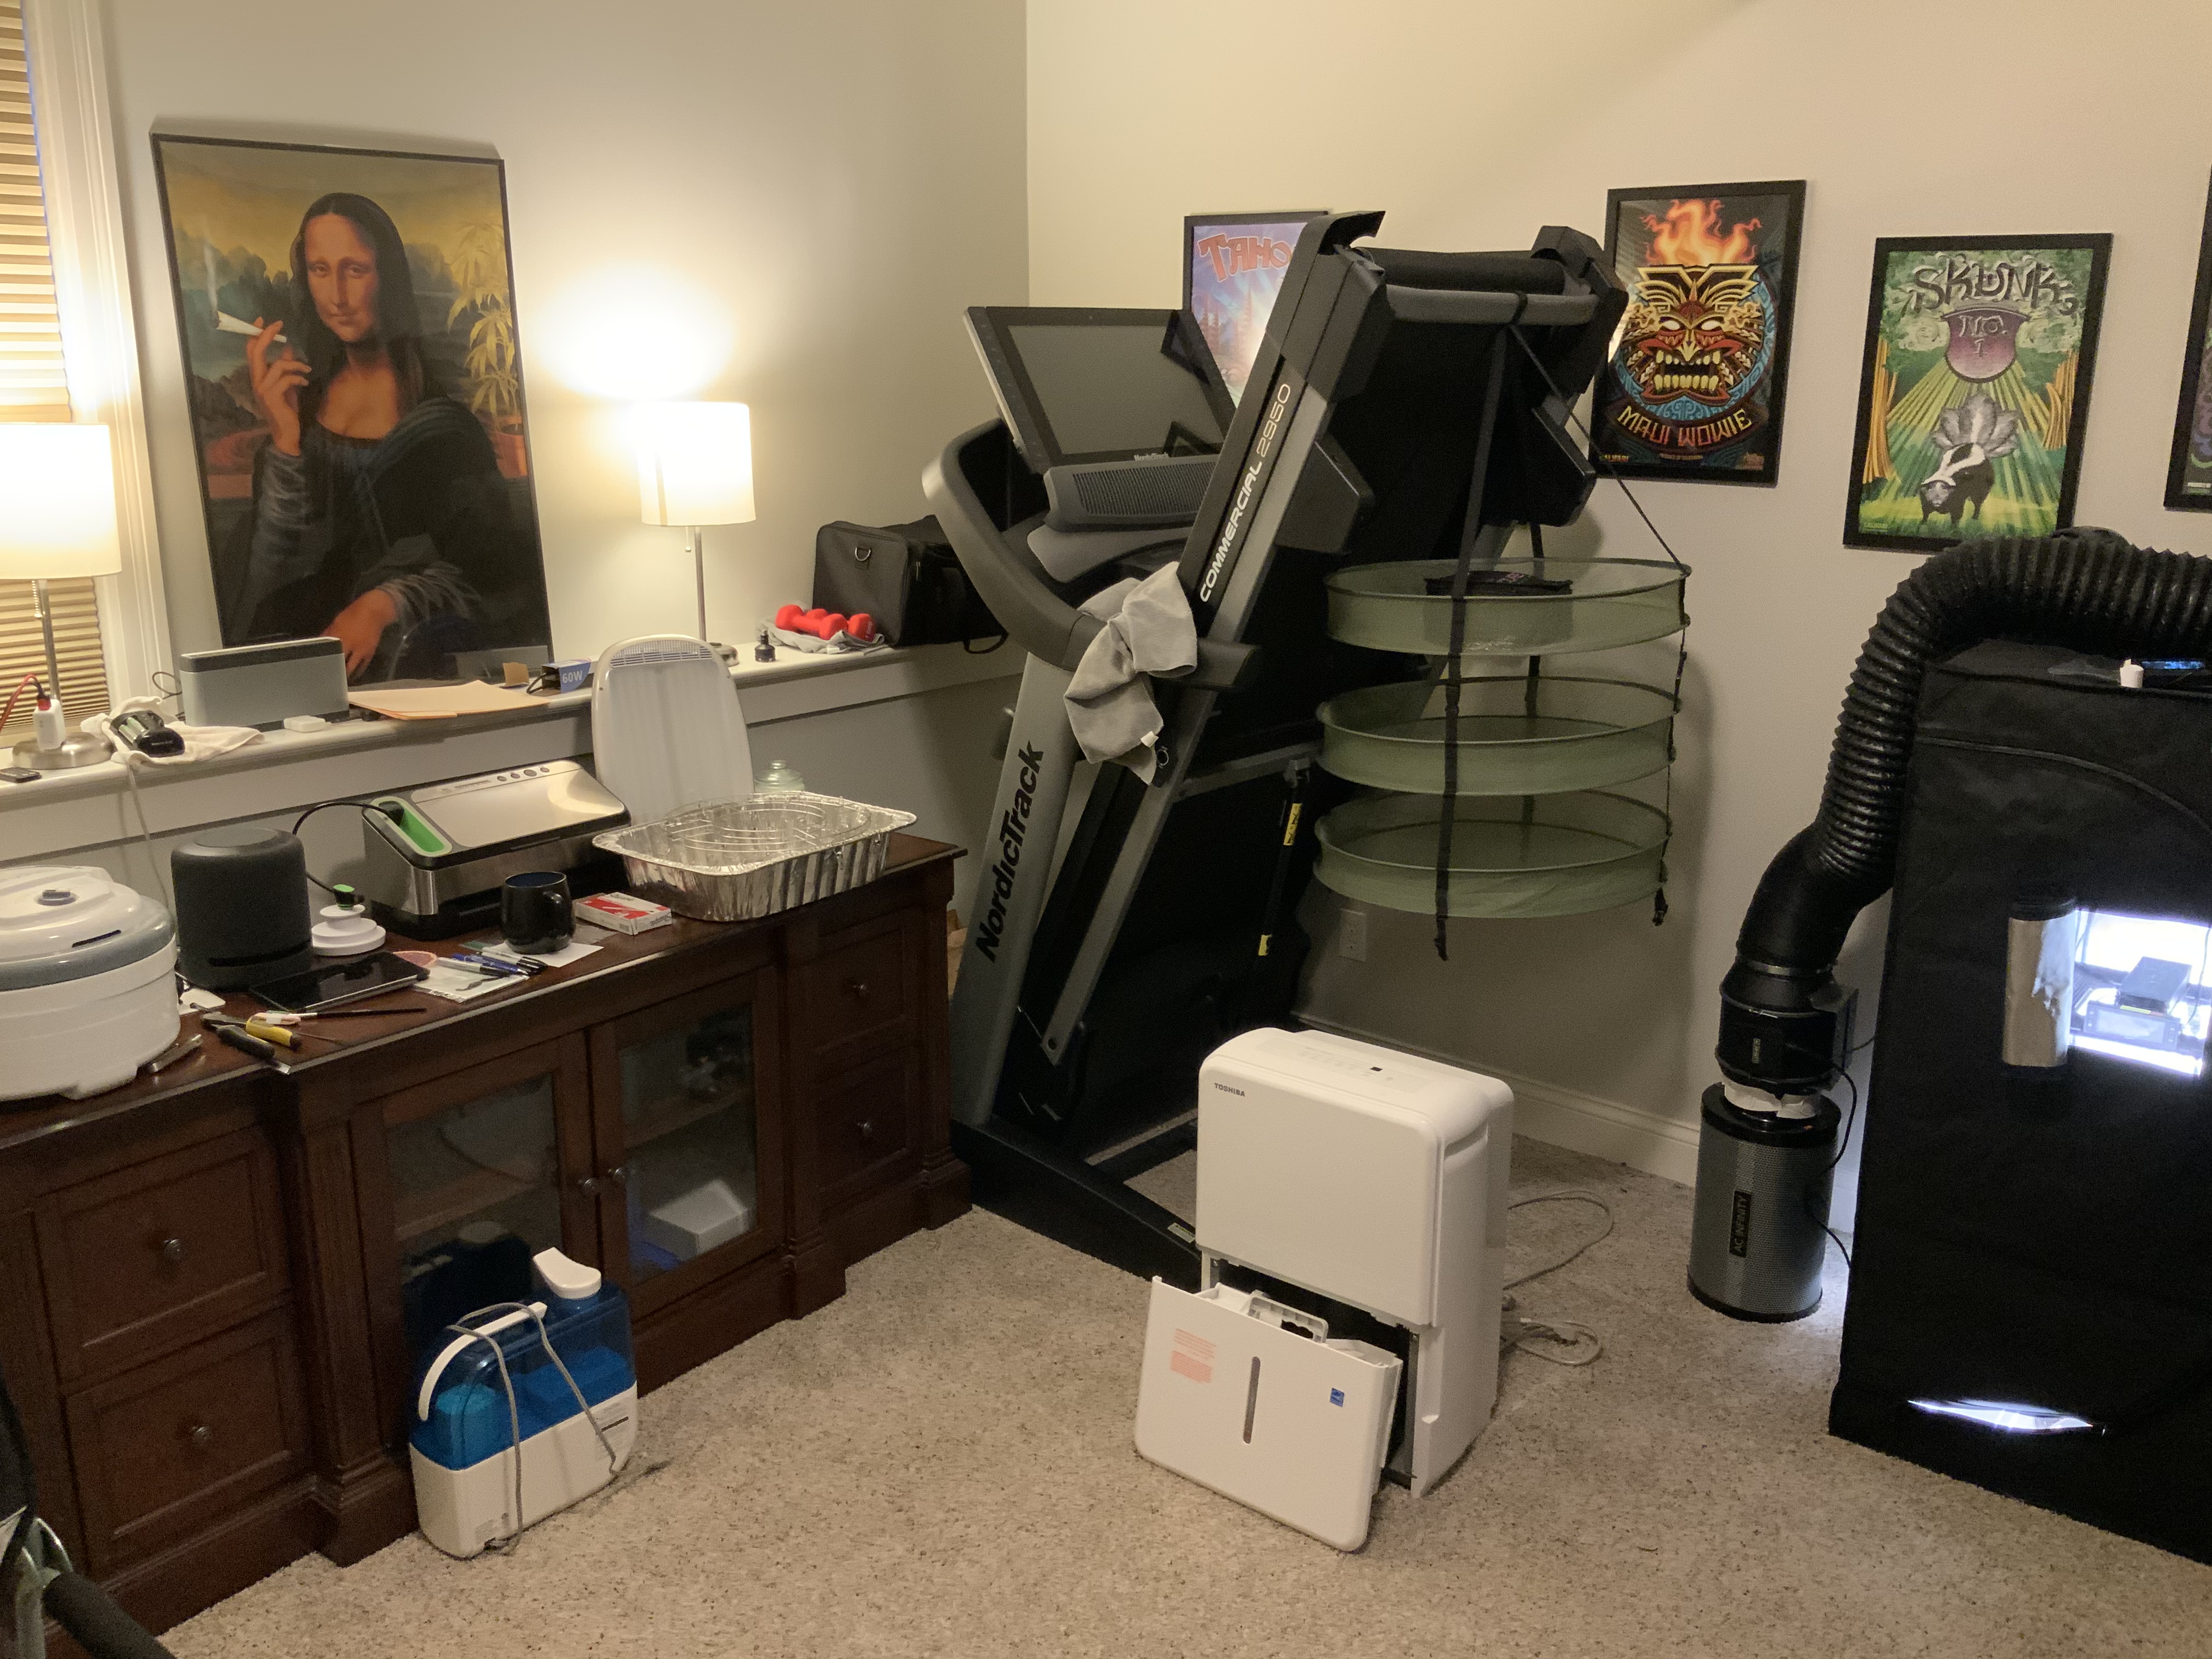
Now that I’m forced to harvest in phases, I won’t be able to use the grow tent for drying. Given that we are hosting several Prohibitionist family members for Thanksgiving, this needs to be stealth. I couldn’t have timed this ending any worse….one matures before Thanksgiving and one matures after Thanksgiving.

With few options (and no construction skills for contraptions), I ordered another tent for drying for Saturday delivery. I have a spare humidifier and in-line fan, so it’s a minimal cost that helps to to avoid any family conflict. Looks like a Sunday harvest here for one Blue Dream.

Also ordered some green LED light bulbs based on Pute’s harvest advice. I’m planning on 18 hours of darkness before harvest and no exposure to light other than green light. I assume that once I’ve removed the branches I can return to normal lighting for the remainder of trimming. I’ve never been good at harvesting, drying or curing….or trimming. Haha. So I have a lot of room for improvement at the end of this grow.

And just for fun, a few photos of the seedlings. The tallest one, the LA Peyote Kush, has crusty leaves at the top where the seed shell had been attached a few days ago. The leaves are attached to each other…..never seen it before. She’s my “backup” seedling as I’m only planning to grow out two plants. I’m not too concerned. I originally thought I could grow three 5 gallon plants in my 2x4. I am reconsidering that number….maybe three autos in 3-gallons is possible , but three photos in 5 gallons is too tight for me.

I’ll try to post a few harvest photos on Sunday. I will also try to respect the buds and avoid using the bowl trimmer. It’s so damn tempting at times.

Thanks for all of the feedback and ideas. I would have probably taken the easy route and harvested both, but this encouraged me to wait and harvest when they are mature.

5D16228A-3029-446D-BAC8-CA6CBC5809FB.jpeg671E0617-A382-47AE-ADB2-4BC8A89D624E.jpegB4D05E89-2E72-45EE-A4E7-9C109D32521E.jpeg8023780E-5049-4C2C-AF86-1DABDA6F8633.jpeg
 
good dealio!

its so easy

GHMicro and GH Bloom is really all a grower needs , ymmv

use the Lucas Formula of 8 ml Micro to 16 ml Bloom….

the Formula can be changed to meet ones plants progress

for example , use 2 ml and 4 ml when they are adolescent , use 4-8 when they are teenagers , and 8-16 when they are mature , we put ours on 8-16 as soon as possible without burning the tips of the leaves
 
It took me a few hours to pull it off, but I finally cleaned up the grow room (mancave) enough to squeeze in a new drying tent. This room has been a disaster for years. My wife leaves me alone here…..I can clutter it up to my heart’s content with hobby equipment. I’ve decorated it with strain prints from Califari….love their artwork. Nobody except my wife has ever stepped foot in here.

Here’s the very very small veg tent (left) and the small 2x4 flower tent. I’ll add another AC Infinity 2x2x4 tent to complete it.

What you can’t see is the pile of crap in the corner….LOL.

00C1C953-8588-41D6-9353-BB4EC6F44B92.jpegBFD782B4-1D8B-4E09-961D-EACFE48B3813.jpeg
 
It took me a few hours to pull it off, but I finally cleaned up the grow room (mancave) enough to squeeze in a new drying tent. This room has been a disaster for years. My wife leaves me alone here…..I can clutter it up to my heart’s content with hobby equipment. I’ve decorated it with strain prints from Califari….love their artwork. Nobody except my wife has ever stepped foot in here.

Here’s the very very small veg tent (left) and the small 2x4 flower tent. I’ll add another AC Infinity 2x2x4 tent to complete it.

What you can’t see is the pile of crap in the corner….LOL.

View attachment 313416View attachment 313418
That’s a beautiful growroom man cave love the artwork too
 
good dealio!

its so easy

GHMicro and GH Bloom is really all a grower needs , ymmv

use the Lucas Formula of 8 ml Micro to 16 ml Bloom….

the Formula can be changed to meet ones plants progress

for example , use 2 ml and 4 ml when they are adolescent , use 4-8 when they are teenagers , and 8-16 when they are mature , we put ours on 8-16 as soon as possible without burning the tips of the leaves

Thanks BigSur! Looks like I have a LOT of GH supplements that I don’t need, and Im really surprised your feed doesn’t include FloraGro ar all. Some of these nutrient companies are making their feed programs so complicated with all of the supplements they push….I like the simplicity your talking about.


I’ll look up the Lucas formula for more information.
 
after looking at the two photos , i am reasonably sure that your pile of crap in the corner is probably a well organized,pile
 
after looking at the two photos , i am reasonably sure that your pile of crap in the corner is probably a well organized,pile

Thanks Big. One would think, but Nope…..it’s my “exercise” equipment. Folded up and out of the way. I point my chair in the direction of the clean side of the room and I don’t notice the mess. haha

It drives my wife as crazy as my old bachelor decor….consisted of nothing but a futon with Pioneer speaker end tables. I don’t need much.
 

Attachments

  • C36A0287-EB04-494C-8F05-A46C6C5C1FA9.jpeg
    C36A0287-EB04-494C-8F05-A46C6C5C1FA9.jpeg
    3.6 MB · Views: 0
I did try the Flora Gro once and did not notice any measurable differences from the plants that just got Micro and Bloom

from what I understand , Micro and Bloom have every nutrient that a plant needs , all one has to do is dial the formula in to fit the particular plant

i especially like the GH nutes!

when i was running 100% Perlite in 5 gallon buckets , there was a HUGE difference in yield between plants grown in 100% Perlite compared to those plants grown in soil
 
Thanks Big. One would think, but Nope…..it’s my “exercise” equipment. Folded up and out of the way. I point my chair in the direction of the clean side of the room and I don’t notice the mess. haha

It drives my wife as crazy as my old bachelor decor….consisted of nothing but a futon with Pioneer speaker end tables. I don’t need much.


dude , like i said , it is a well organized mess!…..hahahhaha!

i love your Mona Lisa!
 
Thanks Big. One would think, but Nope…..it’s my “exercise” equipment. Folded up and out of the way. I point my chair in the direction of the clean side of the room and I don’t notice the mess. haha

It drives my wife as crazy as my old bachelor decor….consisted of nothing but a futon with Pioneer speaker end tables. I don’t need much.
That treadmill looks like mine used to. It made a great platform to store other unused items… ;)
 
That treadmill looks like mine used to. It made a great platform to store other unused items… ;)

I have a matching exercise bike…..they’re both in “dust gray” color. Haha. I had good intentions.
dude , like i said , it is a well organized mess!…..hahahhaha!

i love your Mona Lisa!

The Mona Lisa adds a little culture, don’t you think? Lol
 
Today, the flowering tent sits in darkness in preparation for harvest on one plant tonight. In the meantime, I’m cleaning up the rest of the grow room and getting ready for the next grow.

Decided on nutrient line and supplements. I’m trying to keep this simple, so I’m dropping the extra supplements sold by GH. In the photo, this is everything I plan to use (plus Recharge and Terpinator during flower)
-Water conditioner to remove chloramines in my tap water
-silica (GH Silica)
-GH CaliMagic Cal Mag solution (2ml/g of tap water, 4ml/gallon of RO water)
-MaxiCrop Seaweed Extract for root development
-GH Micro and Bloom (Lucas Formula)
-ph down (my tap water is 9.5 ph)

E80AD6A8-D55B-450C-A12A-07AC51ED80E0.jpeg

Also attaching a few different General Hydroponics “recipes”. “Nebula’s” recipe is from Grow Weed Easy. I found this online on a posting and wanted to keep it here for future reference. I see the Lucas recipe here too.

8E9B3C8B-87E1-444B-9D97-2E196D2C1B0D.png


The three seedlings are moving along. The Godfather OG stem is having difficult standing up straight, so I’m supporting her with a plant stake.

6FEC28F4-2845-40DC-B07D-CC26F10CAEA6.jpeg
 
looks like you are off to the races!

next time you start some seeds , try this:

fill your red beer cups with soil Half Way…….plant the seed that has germed in the cup………when the plants first leaves reach the Top of the cup , add remaining dirt to the Top of the cup and that will support your baby without any staking
 
If your light is to far away it will stretch. I never had a problem with that because I used cfls close to the top of the seedlings where they wouldn't stretch.
Bigs idea will also work especially if they are already stretched.
 
Last edited:
looks like you are off to the races!

next time you start some seeds , try this:

fill your red beer cups with soil Half Way…….plant the seed that has germed in the cup………when the plants first leaves reach the Top of the cup , add remaining dirt to the Top of the cup and that will support your baby without any staking

Great Idea! Dangit. I’ll look at whether I can get a little more soil in these cups, but your solution is so simple. Thank you for improving my process.

If your light is to far away it will stretch. I never had a problem with that because I used cfls close to the top of the seedlings where they wouldn't stretch.
Bugs idea will also work especially if they are already stretched.

Thanks Rosterman. I’ve always used T5 bulbs and they always stayed short for me. Using the LED is new. I’m slowly increasing the light intensity, so hopefully the stretch will stop. I started at 20” with a light intensity at 10%…increased in 10% increments and up to 40% today. The instruction manual recommends 18” above the canopy at 30% for seedlings.

I’m off to go bury these girls in some new soil. Thanks again.
 
As BigSur recommended, I added some really dry Happy Frog soil to the cups to help support the long stems. Misted with seaweed water. This two year old soil really doesn’t like to absorb water. Solo cups are relatively light….will be ready for a deeper water tomorrow. The new soil on top should settle a little bit too with a good watering.

Much better stem support now….these ladies were really stretched. This is my first time growing seedlings under LED.

Before and After adding soil
90A9399E-0DBC-4C90-A0C2-CEAF8A385DFC.jpeg4F1CCDEE-3C51-4092-B9AD-62FF11706D4E.jpeg
 
Welcome to Flower Week 3 (day 2)

I made lighting adjustments today using a new light meter. Lowered the LED from 18” above the plants to 13” which increased light levels from 47,000 lux to 65,000 lux. I then dimmed the light to 55,000 lux to ease them into the higher lighting over the next few days. No water or feed planned for today. I have always maintained an 18” spread with these lights, so this is new to me.

I know that most lux meters are inaccurate with LEDs. This particular meter is specifically designed for white LEDs like mine (Extech LT40), so I feel more comfortable with the data.

This is the closest I’ve ever run these lamps to the plants, so I’ll keep a close eye on them today for signs of heat stress. Unfortunately, the manufacturer Website is down (Timber Grow Lights) and I can’t find their recommended minimum spacing. One thread on another site mentioned being able to go to 12”. So it will be trial and error today. This lux meter is new to me. It has been teaching me a lot about the likely flaws in my historical growing (too much light in veg, not enough in flower).

I believe My goal is to provide 60,000 lux of light in flower.

View attachment 310662View attachment 310661View attachment 310663

The plants don’t seem too stressed from yesterday’s defoliation. Hoping for better airflow with fewer leaves. This scrog can grow thick.

View attachment 310664

View attachment 310665
Nice job!!!💪
 

Latest posts

Back
Top